We found 514 results that contain "instructional design"
Posted on: #iteachmsu

NAVIGATING CONTEXT
Instructional Technology and Development Staff Bio - Dr. Jennifer Wagner
Dr. Jennifer Wagner
Title
Instructional TechnologistD2L and Data CoordinatorInstructional Technology & Development TeamMSU IT - Educational Technology
Education
Certificate in Data Analytics, Google
Certificate in E-Learning Instructional Design, University of California, Irvine
Certificate in Geographic Information Systems, Michigan State University
Associate in Computer Information Systems, Mott Community College
Bachelor’s in French & Linguistics, University of Michigan-Flint
Master’s in Linguistics & Teaching English as a Second Language, Oakland University
PhD in Applied Linguistics, University of South Australia
Work Experience
I have worked in higher education in three countries for the past 15 years. I started as a Writing Center tutor and then taught English, French and linguistics to undergraduate students in the US, France, and Australia. I had always enjoyed using technology to teach my courses, and so I decided to transition to helping both instructors and students navigate the many educational technology tools available today. I was an E-Learning Developer as well as a Helpdesk Support Technician before joining Michigan State University as an Instructional Technologist in 2020.
Professional Interests
I am interested in improving course design by integrating technology and accessibility, while offering technical support and training for instructors and learners. I also enjoy updating the HTML, CSS, and JavaScript in our D2L content templates to add more consistency and interactivity to online courses. Additionally, I create ETL dataflows in Domo Analytics to query the D2L data sets and generate reports for instructors.
Links
LinkedIn ProfileGitHub Profile
MSU Tools & Technologies Course (MSU NetID required)
Authored by:
Jennifer Wagner
Posted on: #iteachmsu
Instructional Technology and Development Staff Bio - Dr. Jennifer Wagner
Dr. Jennifer Wagner
Title
Instructional TechnologistD2L and Data C...
Title
Instructional TechnologistD2L and Data C...
Authored by:
NAVIGATING CONTEXT
Wednesday, Jul 3, 2024
Posted on: #iteachmsu

PEDAGOGICAL DESIGN
Ensuring Alignment with Backwards Design: A Quick Guide on Course Design
Introduction:
Are you looking to create a course that leads to meaningful learning and feels intentional and cohensive for students? Enter backwards design—a powerful approach that starts with the end in mind. Whether you're designing a new course or revamping an existing one, backwards design can help you focus on what really matters: student learning. Here’s a quick guide to getting started with this approach.
Step 1: Identify Desired Results:
Start by asking yourself, "What do I want my students to walk away with?" This step is all about defining your learning objectives—clear, measurable goals that articulate what students should know, understand, and be able to do by the end of your course. Think of these as the compass that will guide every other decision you make. Use an established taxonomy of verbs (such as Bloom's) to ensure these objectives are actionable and observable.
Step 2: Determing Acceptable Evidence:
Once you know where you’re headed, it’s time to think about how you’ll know if students have arrived. This step is all about assessment. What evidence will you accept as proof that students have met the learning objectives? Whether it’s through exams, projects, or presentations, your assessments should align with the level of learning you’re aiming for. Remember, alignment is key!
Step 3: Plan Instruction:
With your objectives and assessments in place, it’s time to plan the journey. How will you get your students from point A to point B? This step involves designing the learning activities and instruction that will support your objectives. Think about what needs to be taught and how it should be taught to achieve your goals. Your aim should be to create engaging, effective learning experiences that build toward the desired results.
Conclusion:
By following these three steps—identifying desired results, determining acceptable evidence, and planning instruction—you can design a course that’s not only cohesive and purposeful but also deeply impactful. Start with the end in mind, and watch your students thrive! Feel free to use the resources below including the worksheet to assist in desgining your course.
Supporting Resources:
Big List of Bloom’s Verbs
Bloom’s Aligned Assessment Suggestions
Worksheet: Backwards Design
Learning Objectives Assessment Suggestor Tool (Note: this tool must be downloaded and launched in Excel for it to work properly)
Understanding by Design (UdB) videos by Grant Wiggens (Part 1, Part 2)
Authored by:
Monica L. Mills
Posted on: #iteachmsu
Ensuring Alignment with Backwards Design: A Quick Guide on Course Design
Introduction:
Are you looking to create a course that leads to mean...
Are you looking to create a course that leads to mean...
Authored by:
PEDAGOGICAL DESIGN
Wednesday, Aug 14, 2024
Posted on: PREP Matrix

PEDAGOGICAL DESIGN
Universal Design
An introduction to universal design, which is a "set of principles for curriculum development that give all individuals equal opportunity to learn."
Posted by:
Admin
Posted on: PREP Matrix
Universal Design
An introduction to universal design, which is a "set of principles ...
Posted by:
PEDAGOGICAL DESIGN
Wednesday, Jul 31, 2024
Posted on: Teaching Toolkit Tailgate
PEDAGOGICAL DESIGN
Designing Your Course “Backward”
Designing Your Course
The semester will begin soon, and we’re sure you’re busy prepping your course. This design work before the beginning of the semester is an essential part of overall student learning and provides a framework you can respond to as you gather assessment evidence across the semester. As you are designing this week, we want to provide some guidance by sharing “backward design” principles from our Preparing Future Faculty for the Assessment of Student Learning (PFF-ASL) Institute. We’ve found these principles extremely helpful for making sure student learning is always in focus and all elements of our courses are aligned toward our learning outcomes.
Designing Your Course “Backward”
Initially introduced by Wiggins and McTighe (1998), “backward design” for curriculum involves building your course from end-of-course learning outcomes, through evidence you’ll gather out of assessments, and finally to the instructional activities students will engage in to help them learn towards readiness for assessments and meeting learning outcomes. In this video, Dr. Cori Fata-Hartley further outlines essential steps of backward design:
Using Dr. Fata-Hartley’s outlining of backward design principles as our guide, here are four questions to help you this week as you’re designing your course:
1) What Do You Hope Students Know and Are Able to Do?: This question can help anchor your creation of learning outcomes. We’ve found “Students Will Be Able To” (SWBAT) as a helpful lead-in statement to direct the writing of our learning outcomes. And remember, your learning outcomes should be observable (and thus assessable), which leads to question # two.
2) What Assessment Evidence Will You Gather?: Answering this question allows you to think about how you’ll know if students have met course learning outcomes. Assessments provide the necessary evidence of learning out of which you can make decisions about where you and students are along the way to meeting learning outcomes.
3) What Learning Experiences Will You Provide for Students?: The learning experiences you plan across your course builds towards the assessments students will do towards learning outcomes. What will students and you engage in at each step along the way? How do these steps lead towards assessments and learning outcomes?
4) Is Your Course Design Aligned?: Tracing across your answers to the previous three questions, you can begin to see whether your course design is aligned. This can allow you to make the necessary revisions towards best alignment and student learning, and keep elements that are already working. This alignment work is a constant process across–and even after–your course as students respond to your design.
Resources
Wiggins, G., & McTighe, J. (1998). Understanding by Design. Alexandria, Va: Association for Supervision & Curriculum Development.
Authored by:
Erik Skogsberg
Posted on: Teaching Toolkit Tailgate
Designing Your Course “Backward”
Designing Your Course
The semester will begin soon, and we’r...
The semester will begin soon, and we’r...
Authored by:
PEDAGOGICAL DESIGN
Thursday, Jul 30, 2020
Posted on: #iteachmsu
PEDAGOGICAL DESIGN
Universal Design for Learning
What is Universal Design for Learning?
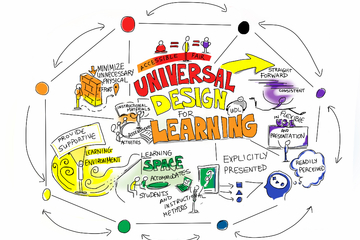
According to the CAST website, Universal Design for Learning (UDL) is “a framework to improve and optimize teaching and learning for all people based on scientific insights into how humans learn.” Although UDL is not exclusive to digital accessibility, this framework prioritizes inclusivity and thus inherently lends itself to the creation of courses that are accessible to all students.
UDL is built on an understanding of the term learning as the interaction and layering of:
Recognition, or the “what”
Skills and Strategies, or the “how”
Caring and Prioritizing, or the “why”
The ultimate goal of UDL is to design a course that is accessible to everyone from its very inception and is open to flexibility. UDL can help instructors create accessible goals, methods, materials, and assessments.
UDL proposes the following three principles to upend barriers to learning:
Representation - present material in a variety of ways
Action and Expression - allow students to share what they know in their own
Engagement - provide students with choices
Explore this topic further in CAST’s “UDL at a Glance”:
UDL GuidelinesLearn more about the Guildlines for UDL via the accessible and interactive table on the CAST website.
Instructional Technology and Development’s Incorporating Universal Design for Learning (UDL) into Your Course Design
Further Reading
Michigan Tech’s guide for UDL
Weaver Library’s Research Guide Universal Design for Learning (UDL) & Accessibility for Faculty
Introduction to Universal Learning Design (UDL) by Shannon Kelly
Sources
About universal design for learning. CAST. (2024, March 28). https://www.cast.org/impact/universal-design-for-learning-udl
This article is part of the Digital Accessibility Toolkit.
Posted by:
Katherine Knowles
Posted on: #iteachmsu
Universal Design for Learning
What is Universal Design for Learning?
According to the CAST websit...
According to the CAST websit...
Posted by:
PEDAGOGICAL DESIGN
Wednesday, Apr 24, 2024
Posted on: Center for Teaching and Learning Innovation
ASSESSING LEARNING
Understandable Assignments: Designing Transparent Assignments through Clear Task Directions
Learning Objectives
Define transparent Task instructions
Describe the importance of clearly written task instructions in an assignment
List 10 tips for writing clearly stated task assignment instructions.
Identify whether the transparency in a set of task instructions is weak or strong
Introduction
This is part 3 of a 5 part series of articles on Transparent Assignment Design (Part 1, Part 2)The second critical element of a transparent assignment is the Task. The task is what students should do and deals with the actions the students have to take to complete the assignment.
The Significance of Transparency in Task
Have you ever had to follow a cooking recipe or build a piece of furniture with poor instructions? Perhaps the instructions were word-heavy or confusing, the steps were out of order, a step was missing, or the diagrams were incorrect, confusing, or absent. When writing instructions for an assignment, especially multi-step, scaffolded types of assignments, we need to think like Instructional Designers. A guiding question that should be at the forefront of an Instructional Designer’s mind is: How could a non-expert complete this activity with the fewest errors? Our goal as educators is to set students up for success, not to create obstacles with unclear instructions. Instructions should be concise, straightforward, include all the required tools/resources, and be seamless to follow.
The "Task" section explains to students the steps they need to take to complete the assignment. It often includes any additional resources that students will need, such as data sets, articles to cite, websites to visit, etc.
Watch:
10 Tips for Writing an Effective “Task” Section:
1. Keep it Simple:
Avoid text-heavy instructions. Over-explaining can lead to distraction and confusion.
2. Use Positive and Direct Instructions:
Cognitive psychologists have found that it is easier for our brains to process what ‘to do’ than what ‘not to do’. If you must add avoidance statements, start with what students should do first.
Focus on direct instructions for what students should do, and limit how often you focus on what students should not do.
Example: Instead of saying, "Don’t forget to use APA style," say, "Use APA style for citations."
3. Consistent Formatting:
Use sparing bolding, underlining, italicizing, highlighting, all caps and font color.
Overuse of these features can create accessibility problems for screen readers and dilute the importance of truly key information.
4. Utilize Visual Aids:
Incorporate screenshots, mini-videos, gifs, and diagrams. As the saying goes, pictures can speak a thousand words and sometimes it's just easier to see someone carry out the task first.
5. Use Lists:
Numbered or bulleted lists help cut back on words and make instructions clearer. Avoid excessive levels of granularity in your lists (e.g., 1.2.5.14), which can be confusing.
6. Leverage Collaborative Tools:
Consider using Google Docs or other collaborative, cloud-based processors instead of the upload/download method of sharing assignment documents.
The perks of using cloud-based processors include avoiding multiple versions of the same document, allowing for seamless updates, embedding of images, videos, and hyperlinks, allowing for students to “comment” on the document.
7. Hyperlink to Resources:
This increases usability and reduces time spent searching for materials buried in the course by centralizing all necessary resources to complete the assignment in one spot.
8. Consistent Labeling of Key Terms:
Use consistent terminology. Avoid using different labels for the same concept, as this can be confusing, especially for non-experts and second-language speakers.
9. Provide Troubleshooting Tips:
Include a separate document with common issues and their solutions, linked from the main instructions. Invite students to help curate this FAQ.
10. Seek Feedback:
Have someone unfamiliar with the assignment go through the instructions or use a generative AI tool to identify areas for improvement in usability and understanding.
Examples of Tasks Instructions
Weak Task Instructions:
Assignment: Write a Literary Analysis Essay on a Novel of Your Choice.
Task Section: Read the novel and write an essay about it.
Explanation: This task section is too vague and lacks specificity. It doesn’t provide clear steps, structure, or resources, leaving students uncertain about what is expected.
Strong Task Instructions:
Assignment: Write a Literary Analysis Essay on a Novel of Your Choice.
Task:
Choose a Novel:
Select a novel from the provided list in the course’s Week 2 folder. Ensure your choice is approved by [date].
2. Read the Novel:
Read the entire novel. Take notes on key themes, characters, and plot points as you read.
3. Develop a Thesis Statement:
Craft a clear, arguable thesis statement that reflects your analysis of the novel. Your thesis should focus on a specific theme, character, or literary device.
4. Gather Evidence:
Collect textual evidence (quotes, passages) from the novel to support your thesis. Make sure to note the page numbers for proper citation.
5. Outline Your Essay:
Create an outline that includes an introduction, body paragraphs, and a conclusion. Each body paragraph should focus on a single point that supports your thesis.
6. Write the First Draft:
Write the first draft of your essay, following the outline. Ensure your essay is 1500-2000 words in length and includes an introduction with a thesis statement, body paragraphs with evidence, and a conclusion.
7. Use MLA Formatting:
Format your essay according to MLA guidelines. Include in-text citations and a Works Cited page for the novel and any other sources you reference.
8. Peer Review:
Submit your draft to the peer review forum by [date]. Review at least two of your classmates' essays and provide constructive feedback.
9. Revise and Edit:
Based on peer feedback and your own review, revise and edit your essay. Focus on clarity, coherence, and correct grammar.
10. Submit the Final Essay:
Submit your final essay via the course’s online portal by [date]. Ensure you attach your draft with peer review comments.
Resources:
Refer to the “Literary Analysis Guide” available in the Resources folder for detailed instructions on developing a thesis and gathering evidence.
Use the “MLA Formatting Guide” linked [here] for help with citations and formatting.
Submission Checklist:
Thesis statement
Evidence from the text with citations
Outline
Draft with peer comments
Final essay in MLA format
Explanation:
This task section is detailed and structured, providing clear, step-by-step instructions and necessary resources. It specifies what students need to do at each stage, the tools they should use, and deadlines, ensuring that students understand how to proceed and complete the assignment effectively.
Resources:
Note: This is article 3 of a 5-part series on Transparent Assignments.
Quick Guide to Transparent Assignments (CTLI:MSU)
Authored by:
Monica L. Mills
Posted on: Center for Teaching and Learning Innovation
Understandable Assignments: Designing Transparent Assignments through Clear Task Directions
Learning Objectives
Define transparent Task instructions
Describe ...
Define transparent Task instructions
Describe ...
Authored by:
ASSESSING LEARNING
Wednesday, Jul 3, 2024
Posted on: Center for Teaching and Learning Innovation

JUSTICE AND BELONGING
Multimedia: Accessible Design Checklist
Accesible Design Checklist: Multimedia
This checklist meant to serve as a starting place, rather than a complete list or expert regulations. Accessibility should be considered throughout all parts of the design process, and designing accessible compositions benefits all people, not just those with disabilities. This post is the third and last part of the Accessible Design Checklist series:
Overview
Text and Content
Multimedia
Multimedia Accessibility
Multimedia includes any design that pairs text, visuals, and/or sound, such as videos, audio recordings, and graphics.
AudioA text version of the transcript is provided for all audio with accurate transcriptions. Ideally, there are also descriptive audio descriptions for users. When possible, the audio should also be high-quality audio with clear language spoken slowly.GraphicsGraphics may include images, photographs, logos, and charts and graphs. For charts and graphs, information should not be communicated with color alone to differentiate between categories. Avoid memes and screenshots of text (except in a logo). All graphics should be marked as decorative or have alternative text (alt-text), which has multiple considerations:
Decorative images convey no meaning nor give additional information for users. Decorative images should be marked as “decorative,” “artifact,” or assigned a null attribution in the code (i.e., alt="").
Alternative text should consider the audience and purpose of the content in its description. This means that only key information is conveyed rather than every extraneous detail.
Alternative text should be concise and generally less than 150 characters. If describing visuals such as paintings or charts, then a long description of the visual can be given within the text and the alternative text can be shorter (e.g., “Vincent van Gough’s 1889 “Starry Night.” More information in long description.”)
Alternative text should not include phrases such as “image of” or “photo of.”
VideoVideos or moving graphics should not flash more than three times per second. Videos should not autoplay, and users should also have the ability to pause the video. In addition, videos should have similar considerations to audio and graphics, including:
A transcript is provided for all audio from the video with accurate transcriptions and descriptive audio. The transcript may also contain descriptions of visual information.
A video has real-time captions, and when possible, sign language interpretation.
References and Resources for Accessible Design
Level Access’ Must-Have Web Content Accessibility Guidelines (WCAG) Checklist
Michigan State University’s Create Accessible Content
University of Washington’s Accessibility Checklist
Web Accessibility in Mind’s WCAG 2 Checklist
Web Accessibility Initiative's Design and Develop Overview
Accessible Design Checklist: Multimedia © 2024 by Bethany Meadows is licensed under CC BY-NC 4.0. The cover photo, "video- (1962) 'Canon Reflex Zoom 8-3' 8mm movie camera- A Modern Rediscovery" by Crunchy Footsteps is licensed under CC BY 2.0.
Authored by:
Bethany Meadows
Posted on: Center for Teaching and Learning Innovation
Multimedia: Accessible Design Checklist
Accesible Design Checklist: Multimedia
This checklist meant to serv...
This checklist meant to serv...
Authored by:
JUSTICE AND BELONGING
Monday, Jul 29, 2024
Posted on: PREP Matrix
NAVIGATING CONTEXT
Cutting Edge Course Design Tutorial
This tutorial guides instructors through the process of designing a course in an innovative manner, with particular emphasis on the geosciences.
Posted by:
Admin
Posted on: PREP Matrix
Cutting Edge Course Design Tutorial
This tutorial guides instructors through the process of designing a...
Posted by:
NAVIGATING CONTEXT
Friday, Aug 30, 2019