We found 180 results that contain "d2l"
Posted on: #iteachmsu
D2L: Customize Your NavBar
The NavBar in D2L is the panel at the top of your course homepage that provides links to important tools and pages. When you open a new course, the NavBar includes a default set of links and drop-down menus to various D2L features. It usually looks something like the image below.
Why customize your NavBar?
You may not use all the tools included in the default NavBar; removing unused items can simplify navigation for students.
A streamlined, relevant NavBar helps students find what they need more efficiently.
You can personalize it to fit your teaching style, whether that’s clean and text-based or visual with icons.
How to customize your NavBar
On your course homepage, locate the NavBar at the top.
Click the three-dot menu icon on the right side of the NavBar.
From the dropdown, select “Customize this NavBar.”
Note: When you customize the NavBar, you're creating a new version of the MSU NavBar for your course.
Edit NavBar Links
Under the “Name” textbox, you’ll see a “Links” section listing all current NavBar buttons.
Hover over any link to delete it or drag to reorder.
Click “Add Links” to include new tools, even ones that normally appear in dropdowns, like “Class Progress,” without adding the entire “Assessments” menu.
Enable icon-based navigation (optional):
Prefer a more visual layout?Check the box labeled “Enable Icon-Based NavBar”, located just below the “Add Links” button. This will display icons instead of (or alongside) text for each link.
Preview and Save
Click “Save and Close” to preview your updated NavBar.
You can continue editing it at any time until it feels just right.
If at any time you want to see what the NavBar looks like, click "save and close." You can edit it as much as needed.
Tips:
Students don’t see all the same tools that you do (e.g., “Course Admin” and “Intelligent Agents”). Use the View as Student feature to check how the NavBar appears from their perspective.
Avoid changing the NavBar after students have access, as it may confuse them.
Example
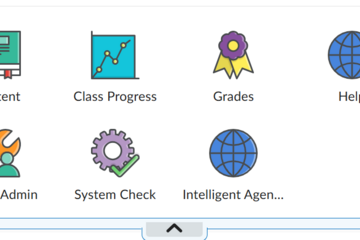
Here’s what my instructor NavBar looks like:It includes only the tools I use, arranged in the order students need them. I’ve removed dropdown menus since I don’t use all the tools they contain. Students see a clean, focused navigation bar that matches how the course is structured.
Why customize your NavBar?
You may not use all the tools included in the default NavBar; removing unused items can simplify navigation for students.
A streamlined, relevant NavBar helps students find what they need more efficiently.
You can personalize it to fit your teaching style, whether that’s clean and text-based or visual with icons.
How to customize your NavBar
On your course homepage, locate the NavBar at the top.
Click the three-dot menu icon on the right side of the NavBar.
From the dropdown, select “Customize this NavBar.”
Note: When you customize the NavBar, you're creating a new version of the MSU NavBar for your course.
Edit NavBar Links
Under the “Name” textbox, you’ll see a “Links” section listing all current NavBar buttons.
Hover over any link to delete it or drag to reorder.
Click “Add Links” to include new tools, even ones that normally appear in dropdowns, like “Class Progress,” without adding the entire “Assessments” menu.
Enable icon-based navigation (optional):
Prefer a more visual layout?Check the box labeled “Enable Icon-Based NavBar”, located just below the “Add Links” button. This will display icons instead of (or alongside) text for each link.
Preview and Save
Click “Save and Close” to preview your updated NavBar.
You can continue editing it at any time until it feels just right.
If at any time you want to see what the NavBar looks like, click "save and close." You can edit it as much as needed.
Tips:
Students don’t see all the same tools that you do (e.g., “Course Admin” and “Intelligent Agents”). Use the View as Student feature to check how the NavBar appears from their perspective.
Avoid changing the NavBar after students have access, as it may confuse them.
Example
Here’s what my instructor NavBar looks like:It includes only the tools I use, arranged in the order students need them. I’ve removed dropdown menus since I don’t use all the tools they contain. Students see a clean, focused navigation bar that matches how the course is structured.
Authored by:
Andrea Bierema
Posted on: #iteachmsu
D2L: Customize Your NavBar
The NavBar in D2L is the panel at the top of your course homepage t...
Authored by:
Thursday, Jun 12, 2025
Posted on: d2l

PEDAGOGICAL DESIGN
Using D2L Templates
D2L Templates
Along your journey towards the start of a new semester you will encounter a crossroads decision: Do you create a new course site from scratch and populate it with previous or familiar materials? Or, should you take the path of the tried and tested? The latter is far more effective, and in a lot of cases, it is the path least traveled. Many instructors and developers are not familiar with the extremely valuable and helpful template resources available within D2L.
Using The D2L Course Templates
Go to https://d2l.msu.edu/d2l/home/1339707 - This is a shell template that you will you to populate your own course site. Notice that this template is consistent throughout. You will be able to modify this once you have copied this template into your course site. It is important to highlight and point out that this template contains all of the policy statements and links for technical assistance. This template conforms to the Quality Matters course design standards. For this reason instructors are encouraged to use this template for building their courses.
Go to your course shell or the course which you are building.
Go to the ‘Course Admin’ tab
Look for the link to ‘Import / Export / Copy Components’
5. Select the ‘Copy Components from another Org Unit’. Uncheck the ‘Include protected resources’ if checked. Select ‘Search for offering’ (See below).
6. In the ‘Search for offering’ search textbox, search for ‘template’. You will see the following as one of the options.
Select the radio button for the ‘Course Design Model - V3 Templates’. Then select ‘Add Selected’.
7. Select ‘Copy All Components’ (see below) 8. Your newly copied template should be within your course shell and look like the image below.
This template contains:
A Getting Started section to add an introduction for your course.
A syllabus section with links to MSU policy statements.
Thirteen modules to edit and modify for your course.
Editing the Course Template
Now that you have imported the course template into your course shell, it is time to add content and make this course your own. There are several things you can do within D2L to make your course more appealing. One key feature within D2L are the templates for pages you build to present your content. Outlined below are the steps to using the course page templates within D2L.
Jazzing Up Your Course Using D2L Templates
Select ‘Create a File’ (See below)
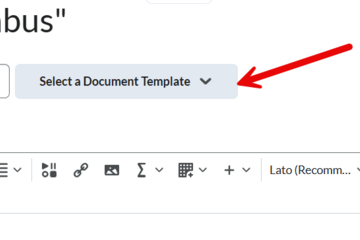
2. Enter a title for the file (page) you are going to create. Next, choose the ‘Select a Document Template’ drop down menu. Look at the options and see the previews before selecting the ‘Save and Close’ option.
The templates are very clean looking in appearance. More importantly, these templates include the MSU digital branding standards and color scheme. You can make modifications to these pages. However, it is recommended to stick to the templates and use the formatting that is embedded within the page. You may encounter some challenges with modification of the accordion or tabs pages if you require more spaces for your content. Thankfully, there are lots of resources to help you when you encounter these issues.
Watch Sue Halick’s presentation on using the D2L templates
https://mediaspace.msu.edu/media/D2L+Content+Templates+for+Consistent+Course+Design+%2808.04.22%29/1_g7em6knt
Along your journey towards the start of a new semester you will encounter a crossroads decision: Do you create a new course site from scratch and populate it with previous or familiar materials? Or, should you take the path of the tried and tested? The latter is far more effective, and in a lot of cases, it is the path least traveled. Many instructors and developers are not familiar with the extremely valuable and helpful template resources available within D2L.
Using The D2L Course Templates
Go to https://d2l.msu.edu/d2l/home/1339707 - This is a shell template that you will you to populate your own course site. Notice that this template is consistent throughout. You will be able to modify this once you have copied this template into your course site. It is important to highlight and point out that this template contains all of the policy statements and links for technical assistance. This template conforms to the Quality Matters course design standards. For this reason instructors are encouraged to use this template for building their courses.
Go to your course shell or the course which you are building.
Go to the ‘Course Admin’ tab
Look for the link to ‘Import / Export / Copy Components’
5. Select the ‘Copy Components from another Org Unit’. Uncheck the ‘Include protected resources’ if checked. Select ‘Search for offering’ (See below).
6. In the ‘Search for offering’ search textbox, search for ‘template’. You will see the following as one of the options.
Select the radio button for the ‘Course Design Model - V3 Templates’. Then select ‘Add Selected’.
7. Select ‘Copy All Components’ (see below) 8. Your newly copied template should be within your course shell and look like the image below.
This template contains:
A Getting Started section to add an introduction for your course.
A syllabus section with links to MSU policy statements.
Thirteen modules to edit and modify for your course.
Editing the Course Template
Now that you have imported the course template into your course shell, it is time to add content and make this course your own. There are several things you can do within D2L to make your course more appealing. One key feature within D2L are the templates for pages you build to present your content. Outlined below are the steps to using the course page templates within D2L.
Jazzing Up Your Course Using D2L Templates
Select ‘Create a File’ (See below)
2. Enter a title for the file (page) you are going to create. Next, choose the ‘Select a Document Template’ drop down menu. Look at the options and see the previews before selecting the ‘Save and Close’ option.
The templates are very clean looking in appearance. More importantly, these templates include the MSU digital branding standards and color scheme. You can make modifications to these pages. However, it is recommended to stick to the templates and use the formatting that is embedded within the page. You may encounter some challenges with modification of the accordion or tabs pages if you require more spaces for your content. Thankfully, there are lots of resources to help you when you encounter these issues.
Watch Sue Halick’s presentation on using the D2L templates
https://mediaspace.msu.edu/media/D2L+Content+Templates+for+Consistent+Course+Design+%2808.04.22%29/1_g7em6knt
Authored by:
Jay Loftus
Posted on: d2l
Using D2L Templates
D2L Templates
Along your journey towards the start of a new semeste...
Along your journey towards the start of a new semeste...
Authored by:
PEDAGOGICAL DESIGN
Tuesday, Jun 4, 2024
Posted on: #iteachmsu
D2L: Customize Your Overview Page
One of the key areas in D2L is the Content section. While instructors create and organize most of the content, there are three sections that appear automatically at the top: Overview, Bookmarks, and Course Schedule.
"Bookmarks" show pages a student has chosen to save.
"Course Schedule" displays calendar items like quiz due dates.
"Overview" is fully customizable, and it’s the first item students see when they enter the Content area.
Why customize your Overview page?
If left blank, the Overview tab won’t appear for students. But adding anything—text or a file—makes it visible.
A personalized overview sets the tone for your course. It can be as simple as a welcome note or as creative as an infographic-style syllabus.
It offers a central place to greet students, direct them to important materials, or give a visual summary of the course.
How do you customize your Overview?
Go to the Content section of your course.
Click on “Overview” in the left-hand navigation pane.
From here, you have two primary options:
Add a written message (e.g., a welcome note or instructions).
Upload a file using the “Add Attachment” button. Note that PDFs appear in an embedded preview window.
You can also do both—include a message and attach a file.
What can you include?
Your Overview page can be as simple or creative as you’d like. Consider:
A brief, friendly welcome note
A short course description
A link to your syllabus
Instructions on how to get started
A welcome graphic
Using a graphic syllabus:
Want to add a creative, visual element? Some instructors choose to use a graphic syllabus: a visual representation of the course structure, themes, or schedule. These can help students grasp big-picture ideas quickly and may be more engaging than text alone.
To use one:
Search online for "graphic syllabus" to view a variety of examples and instructions
Design a graphic or PDF infographic of your syllabus
Make sure it’s accessible (e.g., clear text, high contrast, screen reader-friendly)
Upload it using “Add Attachment” on the Overview page
Programs you can use to create a graphic syllabus:
Canva – Free and user-friendly with templates for infographics, flyers, and syllabi.
PowerPoint – Familiar to many and great for layout flexibility. Save as PDF.
Google Slides – Web-based alternative to PowerPoint, also exportable to PDF.
Adobe Express – Ideal for polished, visual designs; includes free and paid options.
Piktochart – A tool specifically for infographics; allows for easy drag-and-drop design.
Tip: If you go this route, be sure to link to the Overview in your Welcome Announcement so students see it right away (announcements are located on the homepage).
Learn more about accessible design by reading the article "What a cool syllabus... but is it accessible?" by Teresa Thompson.
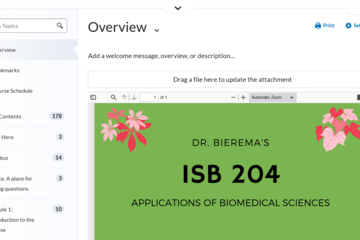
Below is a screenshot of my overview page, in which I created an infographic to represent the course. The infographic is an accessible PDF file, so it appears in a preview window that they can scroll through.
Final Tips
Preview in Student View to confirm what students will see.
Avoid changes after the course begins, unless necessary, and communicate them clearly.
Some attachments (like "Access Google Workspace") may not display even if added—always test in advance.
"Bookmarks" show pages a student has chosen to save.
"Course Schedule" displays calendar items like quiz due dates.
"Overview" is fully customizable, and it’s the first item students see when they enter the Content area.
Why customize your Overview page?
If left blank, the Overview tab won’t appear for students. But adding anything—text or a file—makes it visible.
A personalized overview sets the tone for your course. It can be as simple as a welcome note or as creative as an infographic-style syllabus.
It offers a central place to greet students, direct them to important materials, or give a visual summary of the course.
How do you customize your Overview?
Go to the Content section of your course.
Click on “Overview” in the left-hand navigation pane.
From here, you have two primary options:
Add a written message (e.g., a welcome note or instructions).
Upload a file using the “Add Attachment” button. Note that PDFs appear in an embedded preview window.
You can also do both—include a message and attach a file.
What can you include?
Your Overview page can be as simple or creative as you’d like. Consider:
A brief, friendly welcome note
A short course description
A link to your syllabus
Instructions on how to get started
A welcome graphic
Using a graphic syllabus:
Want to add a creative, visual element? Some instructors choose to use a graphic syllabus: a visual representation of the course structure, themes, or schedule. These can help students grasp big-picture ideas quickly and may be more engaging than text alone.
To use one:
Search online for "graphic syllabus" to view a variety of examples and instructions
Design a graphic or PDF infographic of your syllabus
Make sure it’s accessible (e.g., clear text, high contrast, screen reader-friendly)
Upload it using “Add Attachment” on the Overview page
Programs you can use to create a graphic syllabus:
Canva – Free and user-friendly with templates for infographics, flyers, and syllabi.
PowerPoint – Familiar to many and great for layout flexibility. Save as PDF.
Google Slides – Web-based alternative to PowerPoint, also exportable to PDF.
Adobe Express – Ideal for polished, visual designs; includes free and paid options.
Piktochart – A tool specifically for infographics; allows for easy drag-and-drop design.
Tip: If you go this route, be sure to link to the Overview in your Welcome Announcement so students see it right away (announcements are located on the homepage).
Learn more about accessible design by reading the article "What a cool syllabus... but is it accessible?" by Teresa Thompson.
Below is a screenshot of my overview page, in which I created an infographic to represent the course. The infographic is an accessible PDF file, so it appears in a preview window that they can scroll through.
Final Tips
Preview in Student View to confirm what students will see.
Avoid changes after the course begins, unless necessary, and communicate them clearly.
Some attachments (like "Access Google Workspace") may not display even if added—always test in advance.
Authored by:
Andrea Bierema
Posted on: #iteachmsu
D2L: Customize Your Overview Page
One of the key areas in D2L is the Content section. While instructo...
Authored by:
Thursday, Jun 12, 2025
Posted on: d2l

JUSTICE AND BELONGING
Leveraging D2L's Accessibility Features
D2L has implemented a variety of tools and methods to make course websites more accessible. Explore both Brightspace's resources and MSU's D2L support below.D2L’s Guides for Accessibility
d2l.com/accessibility
Accessibility Gateway
Accessibility Academy
MSU Resources on Making Accessible D2L Sites
D2L Help
MSU IT’s presentation Removing Barriers to Learning: Improve D2L Course Usability and Accessibility with Ally
Spartan Ally
Web Access’ D2L Accessibility Guide
This article is part of the Digital Accessibility Toolkit.
Posted by:
Katherine Knowles
Posted on: d2l
Leveraging D2L's Accessibility Features
D2L has implemented a variety of tools and methods to make course w...
Posted by:
JUSTICE AND BELONGING
Tuesday, Jul 30, 2024
Posted on: #iteachmsu
D2L: Customize Your Content
Want your course content to look more polished and consistent, while also being accessible to all students? D2L’s content templates are a great way to achieve both clarity and visual consistency without needing advanced design skills.
Whether you're already using D2L webpages or you're looking to move away from uploading Word Docs and PDFs, content templates are an excellent way to create clean, accessible, and mobile-friendly course materials.
Why use content templates?
Ensure consistent formatting across all course pages
Improve accessibility and readability for students
Save time by using pre-built layouts instead of designing from scratch
Create content that’s easier to view on all devices, including mobile
Templates are especially helpful for courses with lots of custom text-based instructions, resources, or media links.
How do you use content templates in D2L?
When you create a new webpage (HTML file) in D2L, you have the option to apply a content template. These templates are already built into MSU’s version of D2L and follow accessibility best practices.
Go to the Content section of your course.
Click “Upload/Create” → “Create a File.”
You’ll see a “Select a Document Template” panel on the right.
Choose a layout that fits your needs (e.g., text with image, objectives, etc.).
Edit the content directly in the page editor, then click “Save and Close.”
Watch video tutorials on how to edit content:
For general assistance regarding D2L content, watch this 5-minute tutorial on adding content to D2L courses.
Watch this 5-minute "how-to" video from MSU Instructional Technology and Development. Scroll below the video for links to the templates.
Watch this 3-minute tutorial from Brightspace Tutorials: Edit HTML Templates. This is a helpful walkthrough from D2L's official documentation.
Learn how to modify content templates:
See this #iteachmsu article to learn how to create your own templates.
Authored by:
Andrea Bierema
Posted on: #iteachmsu
D2L: Customize Your Content
Want your course content to look more polished and consistent, whil...
Authored by:
Saturday, Jun 21, 2025
Posted on: #iteachmsu
ASSESSING LEARNING
Building a Survey in D2L
Create surveys for your students.
Select the Surveys link in Course Admin.
Select the New Survey button.
Enter the Name of the survey.
Select Add/Edit Questions if you want to add questions to the survey. See instructions below for more detail.
Select one of the Save options at the bottom of the screen to save your changes. Moving to a different tab of the survey will also save.
To preview your survey, click the caret to open the Actions Menu.
Select Preview.
You will need to make the survey available to students, either by adding the Surveys link to the course navbar or by adding the survey to Content through the Existing Activities button.
You can access MSU's self-enrollment link for D2L self-directed training videos (including surveys) here.
Posted by:
Makena Neal
Posted on: #iteachmsu
Building a Survey in D2L
Create surveys for your students.
Select the Surveys lin...
Select the Surveys lin...
Posted by:
ASSESSING LEARNING
Tuesday, Jun 4, 2024
Posted on: #iteachmsu
D2L: Customize Your FAQ Page
Do your students often ask the same questions every semester? Instead of always pointing them back to the syllabus, consider creating a FAQ (Frequently Asked Questions) page in D2L. It gives students quick answers in one centralized, easy-to-access place.
Why create a FAQ page?
Students often skim or skip the syllabus. A short, targeted FAQ page draws attention to the questions they actually ask.
It saves time by reducing repetitive emails.
D2L has a built-in FAQ tool, so there is no need to create a separate webpage!
How do you create your FAQ page?
Start with your questions.
You can write your FAQs from scratch, or use a generative AI tool like ChatGPT to help you brainstorm.
Example: I uploaded my syllabus to ChatGPT and asked it to suggest 10 questions it predicted undergraduate students would ask. After a few revisions (some answers reflected a different course), I ended up with a refined list of FAQs to add to D2L.
Whether you generate them or write them yourself, try to focus on the 5–10 most common or confusing questions students have.
Find the FAQ tool.
If you're using the default NavBar, click the “Communication” dropdown, then choose “FAQ.”
If you’ve customized your NavBar and removed that menu, you can add a direct link to the FAQ page. See D2L: Customize Your NavBar for help.
Here's my NavBar with the FAQ icon.
Set up categories
When you open the FAQ tool, begin by creating one or more categories (e.g., “Assignments,” “Tech Help,” or just “Top 10 Questions”).
I used to have multiple categories because I had a list of FAQs for each major type of assignment, but later reduced it to just the top 10 FAQs in just one one category. Figure out what works best for you, your course, and your students.
Add your questions
Click “New Question.”
Choose the appropriate category.
Enter your question in the top textbox, and your answer in the lower box.
Feel free to include hyperlinks to other D2L pages or external resources.
Click “Save” to finish or “Save and New” to continue adding.
Reorder your list:
Don't worry about which order you create them- you can reorder them at any time.
Notice in the screenshot above that the dropdown menu "More Actions" includes reordering.
Tips
Announce it! Add a link to your FAQ page in one or more course announcements so students know where to find it.
Focus on the most common questions—too many entries may overwhelm students.
Update each semester. As new questions arise, consider adding or adjusting your list.
If you use AI, double-check everything. Tools like ChatGPT can help you brainstorm, but always review its output for accuracy.
Authored by:
Andrea Bierema
Posted on: #iteachmsu
D2L: Customize Your FAQ Page
Do your students often ask the same questions every semester? Inste...
Authored by:
Thursday, Jun 12, 2025
Posted on: d2l

ASSESSING LEARNING
D2L Online Test Security (settings, time limits, and submission views)
Online Test Security Issues
Unfortunately, it has become far too commonplace for students to “help each other out” by posting test questions and answers on websites. Try a google search for your course code and exam title and you may find sites listing your exam (e.g., Course Hero, Koofers, Chegg, and Quizlet). Also try a search of specific questions to see what’s out there. Most of these sites are meant to help students study and they post honor codes* but not all students will abide by them.
As the instructor, you can ask these study sites to remove your material when you find it.
Here are some ways to minimize issues when using the D2L Quiz tool, while also promoting honesty and learning.
Recommendations to reduce cheating
Limit the opportunity to use outside sources by enforcing a time-limit.
Add a mandatory academic honesty question at the beginning of the exam, asking students to certify that the test represents their independent work.
Create large question pools (reword questions and choices each semester so they cannot be easily searched).
Randomize the question sequence and/or answer choices.
Display one question per page, or at least fewer questions per page. This makes it harder for students to take a screenshot of the questions in bulk.
Craft questions that require critical thinking: Avoid straightforward identification questions, where students can answer through a quick search.
Ask students to select all of the correct answers (use multiple-select type and change the setting to "correct answers" to award partial credit).
Provide limited views of results upon submission. Limiting the viewing window does not prevent copying but it can reduce the ability to go back later to copy.
Use remote proctoring opens in new window for high-stakes exams. The downside can be technical obstacles, cost, and privacy issues (e.g., use of webcams).
Time limits on exams/quizzes
If you are giving an online exam, time-limits help to both reduce cheating and encourage more studying. See The Value of Time Limits on Internet Quizzes opens in new window.
"Time limits on exams are associated with better learning and exam performance because they reduce the opportunity to look up answers in lieu of learning the material."
There is also a setting in D2L quizzes to disable right-click. This prevents students from doing a quick copy of the whole question in order to search for answers in another window.
Another potential issue: Submission Views
If the submission view shows all of the questions and what they got right and wrong as soon as they submit it, this can easily be copied and sent to another student without you seeing it posted on the internet. Random selection helps to make this less of an issue but it would be better to have clear end-dates with restricted submission views. Keep the default submission view as "score only" and then don’t show the other details until after the end-date.
Here are recommended Submission View settings.
DEFAULT VIEW
Date: immediatelyShow Questions? NoStatistics: none(Saying "No" to Show Questions means students will only see a score)
ADDITIONAL VIEWS
Display right/wrong answers after the due dateDate: ##/##/####Show Questions? Yes, Show all questions with user responsesShow question answers: NoStatistics: none (or show statistics - your preference)
Back to score only at end of courseDate: ##/##/####Show Questions? NoStatistics: none
Bring the second additional view back to “score only” at the end of the semester so that views are not left open when you copy the course to a new semester.
Reviewing Quiz results
To review quiz activity, go to Assessments > Quizzes and select "Grade" on the pull-down menu by the quiz title. Go to the attempts tab, and click on individual attempts to review results by student. Click on "Attempt Logs" to see the quiz entry and completion for each student.
Use the pull-down menu next to a Quiz title in the Quiz list view, and select Statistics to view Quiz/Question stats (view each tab).
Also, watch student activity within your course content to understand patterns that may alert you to issues. Look at Table of Contents > related tools > view reports > users tab, to compare quiz results with content views to discover potential issues.
Here are the recommendations from the D2L Brightspace Community to help prevent cheating:
On the Edit Quiz page, in the Optional Advanced Properties area, select Disable right click.
Select Disable Email, Instant Messages and alerts (but only if there is an enforced time-limit). Students will not be able to use D2L email in any of their courses while the quiz is pending.
Incorporate question pools into your quizzes to distribute unique sets of questions to users.
In the Quiz Questions area, select Shuffle questions at the quiz level.
If Sections are used, select Shuffle questions in this section.
Note: You can shuffle within sections rather than shuffling questions at the quiz level if you would like to present auto-graded items first (MC, M-S, T/F) and then present essay (WR) questions later.
*Examples of honor codes
MSU Academic Integrity (PDF) opens in new window
Spartan Academic Pledge opens in new window
Course Hero honor code opens in new window
Chegg Honor Code opens in new window
Quizlet Honor Code opens in new window
Koofers Terms of Use opens in new window
Go to Brightspace D2L Documentation for more on creating and managing quizzes opens in new window.
Authored by:
Sue Halick and Casey Henley
Posted on: d2l
D2L Online Test Security (settings, time limits, and submission views)
Online Test Security Issues
Unfortunately, it has become far too co...
Unfortunately, it has become far too co...
Authored by:
ASSESSING LEARNING
Tuesday, Jun 4, 2024